Table of Contents
ToggleHome security used to mean signing contracts with monitoring companies and drilling holes for professional installers. Not anymore. The Lorex Smart Home Security Center gives homeowners professional-grade surveillance without monthly fees or outside crews tramping through the house. It’s built for people who’d rather mount their own cameras and keep control of their footage, no cloud subscriptions required. This guide walks through what Lorex offers, how to set it up yourself, and whether it’s the right fit for your property.
Key Takeaways
- Lorex Smart Home Security Center offers professional-grade surveillance with local storage, eliminating monthly fees and requiring no cloud subscriptions for DIY homeowners.
- Advanced features like 4K resolution, person/vehicle detection AI, color night vision, and IP66/IP67 weatherproofing make Lorex systems suitable for large properties and extreme climates.
- Local footage storage keeps recordings under your control and private, but creates vulnerability if the NVR is stolen—optional cloud backup adds redundancy at extra cost.
- DIY installation involves strategic camera placement, running PoE cables through walls or attics, and connecting the NVR to your home network—realistic projects for homeowners comfortable drilling and routing cables.
- Lorex lacks native integration with Alexa, Google Assistant, or HomeKit; workarounds via Home Assistant require technical setup, making it less ideal for families seeking seamless voice control.
- Lorex systems range from $300 for basic 4-camera kits to over $1,000 for 16-camera 4K setups, offering excellent value for privacy-conscious homeowners willing to handle their own installation.
What Is the Lorex Smart Home Security Center?
The Lorex Smart Home Security Center is a local network video recorder (NVR) or digital video recorder (DVR) system that connects wired or wireless cameras to a central hub. Unlike cloud-only systems, Lorex stores footage on an internal hard drive, typically 1TB to 2TB, so recordings stay onsite. The hub connects to the home network via Ethernet, and users monitor live feeds or review footage through the Lorex Smart Home app.
Most Lorex systems support 4 to 16 cameras, with options for 4K resolution on higher-end models. Cameras communicate with the hub over Wi-Fi or Power over Ethernet (PoE), depending on the model. PoE cameras draw power and data through a single Cat5e or Cat6 cable, which simplifies installation and eliminates the need for separate power adapters at each camera location.
Lorex markets itself to DIYers who want professional features, motion zones, night vision, person/vehicle detection, without recurring fees. The system doesn’t require a monitoring contract, though Lorex does offer optional cloud backup plans for redundancy. It’s a middle ground between basic Wi-Fi cameras and full commercial setups.
Key Features That Set Lorex Apart
Lorex systems lean on a few core strengths that appeal to privacy-focused homeowners and hands-on installers.
4K resolution on flagship models delivers crisp detail at distances up to 100 feet in daylight. Color night vision, available on models with built-in spotlights or ambient light sensors, captures full-color footage after dark, unlike traditional infrared that records in black and white. The Lorex 4K Spotlight model, for example, uses LED spotlights to illuminate scenes and record color video at night.
Person and vehicle detection uses onboard AI to filter alerts. Instead of notifications for every passing cat or windblown branch, the system flags motion from people or cars. This reduces false alarms and makes review faster. Some models add package detection for front-porch monitoring.
Weatherproof housings rated IP66 or IP67 handle rain, snow, and dust. Cameras operate in temperatures from -22°F to 140°F, covering most climates. Floodlight models, such as the Lorex 2K Floodlight, combine lighting and recording in one fixture, useful for driveways or backyard entries.
Two-way audio on select cameras lets users speak through the app to delivery drivers or visitors. Audio quality varies, expect clear speech, not studio recording, but it’s functional for porch intercoms or deterring trespassers.
Local Storage and Privacy Control
Lorex’s defining feature is local storage. Footage records to the NVR’s internal hard drive, not a remote server. This keeps recordings under the homeowner’s control and avoids monthly cloud fees. If internet goes down, cameras still record: playback just requires local network access.
Local storage also sidesteps privacy concerns tied to cloud services. No third party holds encryption keys or terms-of-service clauses that permit data sharing. For homeowners wary of corporate access to security footage, this is a selling point.
The downside: if someone steals the NVR, they take the recordings. Lorex offers optional cloud backup via subscription for offsite redundancy, but it’s not required. Some users add a lockbox or hide the NVR in a closet to protect the hard drive.
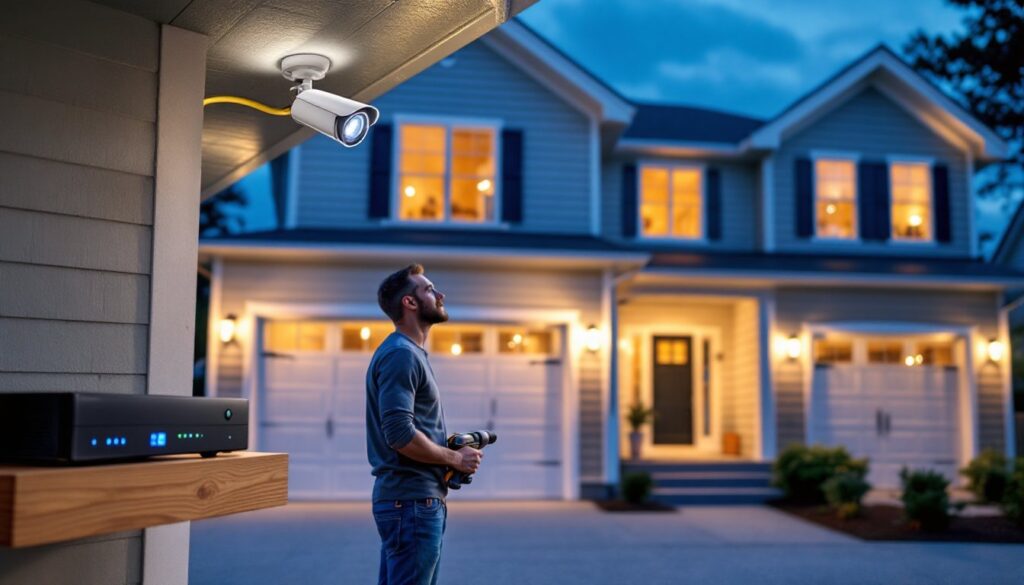
Setting Up Your Lorex Security System: A DIY Installation Guide
Lorex systems ship as kits: NVR/DVR, cameras, cables, power adapters, and mounting hardware. Installation difficulty depends on whether you choose wired or wireless cameras.
Step 1: Plan camera placement
Walk the property and mark locations for cameras. Prioritize entry points, front door, garage, back slider, and sight lines that cover driveways or side gates. Avoid aiming cameras directly at bright lights or the sun: glare washes out detail. Mount cameras 8 to 10 feet high to prevent tampering but keep faces visible. Check that Wi-Fi signal reaches wireless camera locations: thick walls or metal siding can block signal.
Step 2: Mount cameras
Use the included mounting plate as a template. Drill pilot holes with a 3/16-inch bit for masonry anchors or a 1/8-inch bit for wood. Secure the plate with #8 or #10 screws. For brick or stucco, use plastic anchors or toggle bolts. Thread cables through the base before tightening the camera to the plate. Seal cable entry points with silicone caulk to prevent water infiltration.
Step 3: Run cables (PoE systems)
PoE cameras need a single Ethernet cable from each camera to the NVR. Route cables through attics, crawlspaces, or along exterior walls. Use outdoor-rated Cat5e or Cat6 for exposed runs: standard indoor cable degrades in UV. Staple cables every 12 inches along studs or joists, but don’t compress the jacket, it can damage conductors. For long runs over 300 feet, add a PoE extender to maintain power and signal.
Step 4: Connect the NVR
Plug cameras into the NVR’s PoE ports (labeled on the back). Connect the NVR to the home router via Ethernet, Wi-Fi isn’t supported for the hub itself. Attach the NVR’s power supply and turn it on. Most systems auto-detect cameras and display live feeds within 60 seconds.
Step 5: Configure settings
Access the NVR through a connected monitor (HDMI or VGA) or via the Lorex app. Set motion zones to ignore high-traffic areas like public sidewalks. Adjust recording schedules, continuous, motion-only, or scheduled windows. Enable two-factor authentication on the app to secure remote access. Understanding how to secure smart home devices is critical when setting up any network-connected system.
Safety note: Wear safety glasses when drilling overhead. Use a non-contact voltage tester if drilling near electrical boxes. If running cables through walls with existing wiring, turn off power to those circuits at the breaker.
How the Lorex Smart Home App Simplifies Daily Monitoring
The Lorex Smart Home app (iOS and Android) streams live video, sends push notifications, and plays back recorded clips. The interface is straightforward: thumbnail grid for camera selection, timeline scrubber for playback, and settings menu for adjustments.
Live view displays all cameras in a grid or full-screen single feed. Pinch-to-zoom works on 4K models, useful for reading license plates or faces at a distance. Two-way audio activates with a tap-and-hold button: release to listen.
Push notifications arrive when motion is detected. Alerts include a thumbnail preview, and tapping opens the clip. Smart detection filters (person, vehicle, package) reduce irrelevant alerts. Notification sensitivity adjusts in 1–10 increments: lower numbers mean fewer alerts.
Playback searches by date, time, or event type. The app generates a timeline with color-coded markers for motion events. Scrub the timeline to jump to activity. Export clips to the phone’s camera roll or email them as evidence.
Geofencing (on select models) arms or disarms cameras based on the phone’s location. Leave the house, and cameras activate: return, and they pause recording. This saves storage and battery life on wireless models.
The app requires a Lorex account with email and password. Enable two-factor authentication in settings to prevent unauthorized access. Remote viewing works over cellular data or Wi-Fi, but 4K streams can consume 500MB per hour on LTE, set the app to lower resolution for mobile networks.
Integrating Lorex with Your Existing Smart Home Ecosystem
Lorex systems don’t natively support Amazon Alexa, Google Assistant, or Apple HomeKit as of 2026. This is a trade-off for local storage and privacy, cloud-free operation means fewer integration hooks.
But, workarounds exist. Home Assistant, an open-source smart home platform, can pull Lorex camera feeds via ONVIF or RTSP protocols. This requires some technical comfort: installing Home Assistant on a Raspberry Pi or dedicated server, then adding Lorex cameras as ONVIF devices using the camera’s IP address and credentials. Once integrated, feeds display in Home Assistant dashboards and can trigger automations, like turning on porch lights when motion is detected.
For homeowners who prefer plug-and-play, Lorex’s isolation from mainstream ecosystems is a limitation. Systems that tie into Amazon smart home devices offer tighter voice control and routine integration, but they also send data to external servers.
Smart window sensors and door locks can coexist with Lorex on the same network. Pairing a smart window sensor with Lorex cameras creates layered security: sensors alert to window openings, and cameras capture who triggered them. Similarly, smart lock scheduling can coordinate lock/unlock times with camera recording schedules, though this requires manual setup rather than native automation.
If ecosystem integration is a priority, consider whether Lorex’s privacy benefits outweigh the convenience of unified voice control. For families already invested in Alexa or Google, the lack of native support may feel limiting.
Is Lorex Right for Your Home? Pros and Cons to Consider
Lorex excels in specific scenarios and falls short in others. Here’s the honest breakdown.
Pros:
• No monthly fees for local recording. One-time hardware cost, no subscription lock-in.
• High resolution on 4K models captures detail at distance, useful for large yards or driveways.
• Local storage keeps footage private and accessible during internet outages.
• DIY-friendly installation for homeowners comfortable with drills and cable routing. PoE simplifies power delivery.
• Weatherproof and durable cameras handle extreme temperatures and precipitation.
Cons:
• No native smart home integration with Alexa, Google, or HomeKit. Requires workarounds for automation.
• Wired systems demand cable runs, which may require crawling through attics or drilling exterior walls. Not ideal for renters or those avoiding wall penetrations.
• Limited cloud options compared to competitors. Cloud backup is optional and costs extra.
• App interface is functional but plain, lacking polish of consumer-focused competitors.
• NVR theft risk: if someone takes the hub, recordings go with it (unless cloud backup is active).
Lorex fits homeowners who prioritize privacy, one-time costs, and hands-on installation. It’s less suited to renters, those seeking seamless voice control, or anyone uncomfortable running cables. For households exploring smart home devices for seniors, ease of use may tip the scale toward simpler wireless systems with cloud storage.
Permitting note: Camera installation typically doesn’t require permits, but check local ordinances if mounting to shared walls (condos, townhomes) or recording areas visible to neighbors. Some jurisdictions regulate audio recording in public-facing spaces.
Lorex systems start around $300 for a 4-camera 1080p kit and climb to $1,000+ for 16-camera 4K setups. Prices fluctuate with hard drive size and camera features. Good Housekeeping periodically reviews home security systems and may offer seasonal buying guidance.
For DIYers who value control over convenience and don’t mind drilling a few holes, Lorex delivers professional-grade security without the professional price tag. Just be realistic about the setup time and the ecosystem trade-offs.