Table of Contents
ToggleGood lighting over a kitchen island can transform the whole room, turning a dark workspace into a well-lit, inviting hub for cooking, assignments, and late-night snacks. But hanging fixtures involves more than just picking something that looks nice in the catalog. You’ll need to consider scale, spacing, electrical work, and how the light actually performs when you’re chopping vegetables or checking assignments.
This guide covers the practical side of island lighting: what works, what doesn’t, and how to install it yourself if you’ve got basic electrical experience and the right permit.
Key Takeaways
- Lights over kitchen island should hang 30–36 inches above the countertop to provide shadow-free task lighting while maintaining safe head clearance and sightlines.
- Pendant lights remain the most popular choice for kitchen islands because they’re modular, come in endless styles, and deliver direct downlight ideal for detailed work.
- The width of your island lighting fixture should be roughly two-thirds to three-quarters the width of the island to achieve proper visual balance and proportion.
- For islands under 4 feet use one pendant, 4–6 feet use two pendants, and 6+ feet use three pendants or a linear fixture to ensure adequate coverage of 3,000–4,000 lumens.
- Most jurisdictions require an electrical permit for adding new lights over a kitchen island, and DIY installation of new fixtures involves routing cable, securing junction boxes to joists, and ensuring NEC-compliant wiring practices.
Why Kitchen Island Lighting Matters
Most kitchens rely on overhead recessed cans or flush-mount ceiling fixtures that spread light evenly, but not where you need it most. Islands sit below general ceiling fixtures, and without dedicated task lighting, you end up working in your own shadow.
Task lighting is the main reason to hang lights over an island. Whether you’re slicing onions, rolling dough, or assembling a lunch, you need focused, shadow-free light on the countertop. Pendant lights positioned 30 to 36 inches above the surface deliver concentrated illumination right where hands and cutting boards live.
But it’s not just about function. Island lighting creates visual balance in an open-concept kitchen. A row of pendants or a linear fixture draws the eye and anchors the space, especially when the island serves as a boundary between the kitchen and living area. Designers often treat island fixtures as jewelry for the room, they set the tone for the entire space.
Finally, good island lighting supports the way modern kitchens actually get used. Islands aren’t just prep zones anymore. They’re breakfast bars, assignments desks, and cocktail stations. Adjustable or dimmable fixtures let you shift from bright task lighting during meal prep to softer ambient light during dinner or conversation.
Popular Kitchen Island Lighting Styles
Pendant Lights
Pendant lights are the go-to choice for most kitchen islands. They hang from the ceiling on a cord, chain, or rod, and they come in an endless variety of shapes, sizes, and finishes. Glass globes, metal shades, woven rattan, concrete, there’s a pendant for every style, from farmhouse to industrial to mid-century modern.
Pendants work well because they’re modular. You can hang one large pendant over a small island, or space two or three evenly over a longer surface. They also provide direct downlight without blocking sightlines across the room, which matters in open kitchens where the island faces the living area.
When choosing pendants, pay attention to the shade shape. Open-bottom shades (like drum or cone styles) throw light straight down, which is ideal for task lighting. Enclosed or translucent globes diffuse light in all directions, they look great but may not deliver enough focused light for detailed work. If you want both, consider pairing pendant task lights with under-cabinet lighting on the perimeter counters.
One practical note: cord length matters. Most pendants ship with adjustable cords or rods, but double-check the maximum and minimum hang length before ordering. You may need to shorten the cord during installation to hit the right height, which is easy with most fixtures but requires wire cutters and basic electrical connectors.
Chandeliers and Linear Fixtures
Chandeliers bring a more formal or dramatic look to a kitchen island. They work best over larger islands (at least 6 feet long) or in kitchens with higher ceilings (10 feet or more). A chandelier consolidates multiple light sources into one statement piece, and it can serve double duty as both task and ambient lighting if it includes dimmable bulbs.
Just be realistic about scale. A chandelier that looks elegant in a showroom can overwhelm a modest kitchen. Measure carefully and mock up the fixture’s footprint using painter’s tape on the ceiling before you buy.
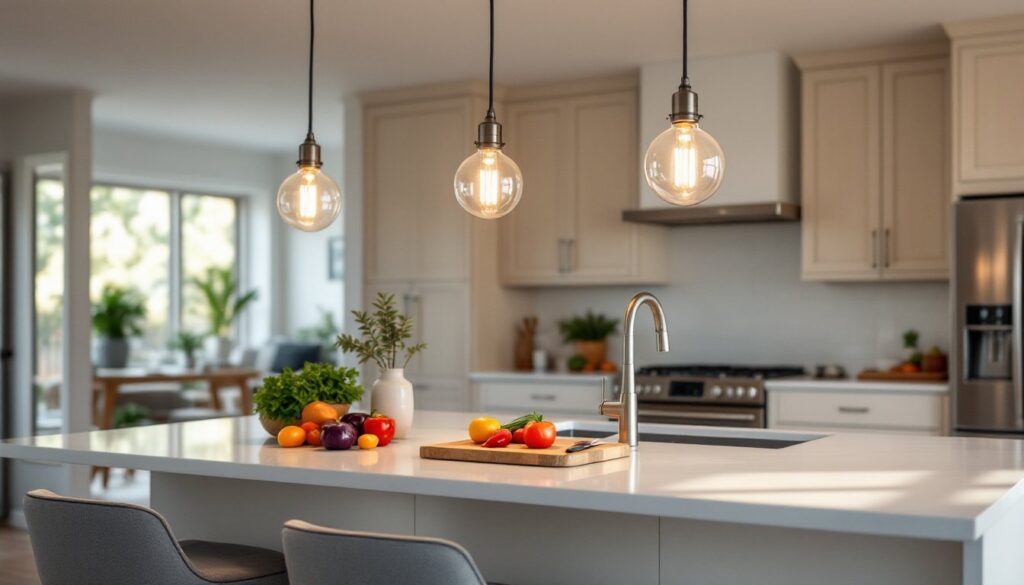
Linear fixtures, sometimes called island lights or billiard lights, are long, horizontal fixtures designed specifically for kitchen islands and dining tables. They range from sleek LED strips to multi-bulb designs with exposed filaments. Linear fixtures distribute light evenly across the entire island length, which eliminates the guesswork of spacing multiple pendants.
These fixtures are especially useful over islands that double as dining surfaces. They provide consistent light without the visual interruption of multiple hanging elements. Many design-focused platforms showcase linear fixtures in contemporary and transitional kitchens where clean lines and symmetry are priorities.
One advantage: fewer electrical boxes. Installing three pendants means three separate junction boxes in the ceiling, which can complicate retrofit projects. A single linear fixture requires just one box and one connection, saving time and potential drywall repair.
How to Choose the Right Size and Height
Fixture width should be proportional to the island. A common rule: the pendant or chandelier should be about two-thirds to three-quarters the width of the island. For a 4-foot-wide island, look for fixtures (or a grouping) that span roughly 30 to 36 inches.
If you’re hanging multiple pendants, treat the group as a single visual unit. Space them evenly, and make sure the combined width of the fixtures, including the gaps between them, doesn’t exceed about three-quarters of the island’s length. For example, over a 6-foot island, three 10-inch pendants spaced 18 inches apart will span about 66 inches total, which feels balanced.
Height is critical for both function and safety. The bottom of the fixture should hang 30 to 36 inches above the countertop. This range provides ample task lighting without obstructing sightlines or creating a head-bonking hazard. If you have especially tall household members or the island sees a lot of standing work, err toward 36 inches. If the island is primarily a seated breakfast bar, you can drop fixtures closer to 30 inches.
Before you finalize the height, consider the ceiling height. In kitchens with 8-foot ceilings, a pendant hanging 30 inches above a 36-inch-tall counter leaves just 66 inches of clearance from floor to fixture. That’s tight for taller people. In rooms with 9- or 10-foot ceilings, you have more flexibility.
One more variable: seated vs. standing use. If bar stools are pulled up to the island, the fixture needs to clear heads when people are seated. Test the height with a temporary mock-up (a cardboard box on a string works) and sit at the island to check sightlines and head clearance before drilling any holes.
Material also affects perceived size. A 12-inch glass globe pendant feels lighter and less intrusive than a 12-inch solid metal drum shade. When in doubt, go slightly smaller, oversized fixtures can dominate a kitchen and make the space feel cramped.
How Many Lights Do You Need?
The number of fixtures depends on island length, fixture size, and how much light you actually need. There’s no universal formula, but here are practical guidelines.
For islands under 4 feet long, one pendant or small chandelier usually suffices. Choose a fixture with enough wattage or lumens to cover the whole surface, aim for at least 35 to 50 lumens per square foot of island countertop for task lighting.
For islands 4 to 6 feet long, two pendants are standard. Space them evenly, typically 24 to 30 inches apart (center to center), and center the pair over the island length. If you’re using larger pendants (12 inches or wider), two is usually enough both visually and functionally.
For islands 6 to 8 feet or longer, three pendants or a single linear fixture work best. Three pendants should be spaced about 30 to 36 inches apart, again centering the group as a whole over the island. Some designers recommend curated pendant collections that offer matched sets designed for this exact spacing.
Lumens matter more than bulb count. LED bulbs vary widely in output. A 60-watt-equivalent LED might produce anywhere from 800 to 1,100 lumens depending on the brand. For task lighting, aim for a combined output of 3,000 to 4,000 lumens over a typical 6-foot island. That might mean three pendants with 1,000-lumen bulbs each, or a single linear fixture with integrated LEDs rated at 3,500 lumens.
Don’t forget dimmer compatibility. Not all LED bulbs dim smoothly, and some flicker or hum on cheaper dimmer switches. If you plan to install a dimmer (and you should, it’s the easiest way to adapt light levels for different tasks), check that both the bulbs and the dimmer are rated for LED use and compatible with each other.
Installation Tips for DIY Enthusiasts
Before you start: permits and safety. In most jurisdictions, adding or relocating light fixtures requires an electrical permit, especially if you’re running new wiring or adding junction boxes. Check with your local building department. If you’re uncomfortable working with live electrical wiring, hire a licensed electrician. Electricity isn’t forgiving.
If you’re replacing an existing fixture over the island (swapping an old pendant for a new one), the job is straightforward. Turn off the circuit breaker, confirm power is off with a non-contact voltage tester, disconnect the old fixture, and wire in the new one following the manufacturer’s instructions. Match black to black (hot), white to white (neutral), and connect the ground wire (bare copper or green) to the ground screw or wire in the box.
Installing new fixtures where none existed is more involved. You’ll need to:
- Locate ceiling joists using a stud finder. Junction boxes must be fastened to solid framing or a support bar rated for the fixture’s weight.
- Cut ceiling openings for each junction box. Use a drywall saw or oscillating multi-tool.
- Run electrical cable (typically 14/2 or 12/2 Romex, depending on circuit amperage) from the nearest power source to each new box. This often means fishing wire through the ceiling cavity, which can be tricky in finished spaces. In some cases, you may need to access the space from above (attic) or cut additional access holes and patch drywall later.
- Install the junction box. For retrofit work, use an old-work ceiling box with adjustable bar hangers if you can’t hit a joist directly. Make sure the box is rated for the fixture weight, fans and heavy chandeliers require braced boxes.
- Connect the fixture following NEC-compliant wiring practices: secure wire nuts, tuck wires neatly into the box, and ensure the fixture canopy covers the box completely.
Safety gear: Wear safety glasses when cutting drywall or drilling overhead, and use a sturdy ladder or scaffold. Don’t stand on countertops, kitchen islands aren’t structural platforms.
Leveling multiple pendants can be frustrating. Adjustable-cord pendants make this easier, but even so, slight differences in cord length are magnified when fixtures hang side by side. Measure from the ceiling to the bottom of each shade, not from the countertop, since floors and ceilings aren’t always level. A laser level helps immensely for aligning multiple boxes during rough-in.
If your island is large and you’re unsure about spacing, mock up the layout with painter’s tape on the ceiling and check design references for visual examples. It’s easier to adjust tape than to patch and relocate a junction box.
Dimmer installation: Replace the existing switch with a compatible LED dimmer. Turn off power at the breaker, remove the old switch, connect the new dimmer’s wires per the instructions (usually two black wires to the line and load terminals, plus a ground), and test. If bulbs flicker or don’t dim smoothly, you may need a different dimmer model, not all dimmers play nicely with all LEDs.