Table of Contents
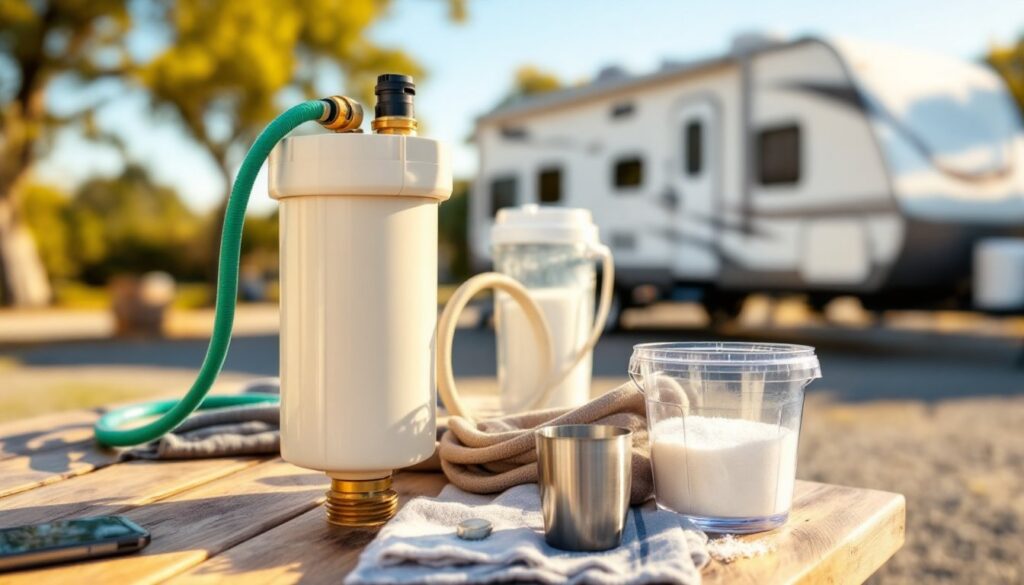
ToggleHard water isn’t just a problem at home. If you’re traveling in an RV, living on a boat, or camping with your family, mineral-laden water can still wreak havoc on your plumbing, skin, and appliances. That’s where portable water softeners come in, compact, regenerable units designed to treat water wherever you go. Unlike whole-house systems that require permanent installation and a drain line, on-the-go water softeners are lightweight, easy to set up, and can be recharged with ordinary table salt. Whether you’re dealing with spotty dishes, stiff laundry, or crusty faucets on the road, a portable softener can solve those issues without the weight or complexity of traditional equipment.
Key Takeaways
- An on-the-go water softener uses ion-exchange resin to remove calcium and magnesium minerals, delivering 300 to 1,600 gallons of softened water between manual salt regenerations requiring no electricity or drain.
- Portable water softeners prevent scale buildup in RV water heaters, reduce soap scum on boats, and protect expensive onboard plumbing and appliances from mineral damage during travel.
- When choosing a portable softener, prioritize grain capacity (16,000 to 64,000 grains), resin quality, 3/4-inch hose fittings, flow rates of 3–5 GPM, and lightweight portability for frequent moving.
- Proper maintenance including regeneration every 250–300 gallons with table salt, regular hose inspections, and periodic water testing extends the lifespan of your on-the-go system for years of reliable performance.
- Portable softeners cost $150–$300 with no professional installation needed, making them significantly more affordable than permanent systems ($400–$600+) for RV owners, boat dwellers, and renters who need mobile water treatment.
- Test softened water with a hardness kit to confirm effectiveness; hardness should read 0–1 grains per gallon (gpg) after treatment to ensure your portable softener is working properly.
What Is an On the Go Water Softener and How Does It Work?
An on-the-go water softener is a compact, self-contained ion-exchange system that removes calcium and magnesium from water using resin beads. The resin attracts and holds onto hardness minerals while releasing sodium ions in their place, the same chemical process used in stationary home softeners, just scaled down.
Most portable units hold between 16,000 and 64,000 grains of hardness capacity, which translates to roughly 300 to 1,600 gallons of softened water depending on your source water’s hardness level. When the resin bed becomes saturated with minerals, it’s regenerated by flushing it with a concentrated salt brine. This process takes about 30 to 60 minutes and can be done manually with table salt and a bucket, no electricity or drain connection required.
These systems typically use standard garden hose fittings for inlet and outlet connections, making them compatible with RV city water hookups, boat water systems, or portable shower setups. Flow rates range from 3 to 5 gallons per minute, which is sufficient for showers, sinks, and small appliances but won’t keep up with simultaneous high-demand fixtures.
Why You Need a Portable Water Softener for RVs, Boats, and Travel
Hard water doesn’t stay home. Municipal and well water across much of the U.S., especially in the Southwest, Midwest, and Florida, contains 7 to 15 grains per gallon (gpg) or more of dissolved minerals. When you’re traveling, those minerals follow you.
Without a softener, scale buildup clogs RV water heaters, stains fiberglass showers, and leaves white residue on dishes and glassware. Over time, mineral deposits reduce the efficiency of tankless water heaters and can shorten the lifespan of pumps and fixtures. Hard water also reduces soap efficiency, meaning you’ll use more detergent and shampoo to get the same results.
For boaters, salt spray and hard water create a double threat. Softened water makes rinsing easier and prevents soap scum buildup in tight galley and head spaces. RV owners benefit from softer water that protects expensive onboard plumbing and makes laundry day less frustrating at campground facilities. Many appliance reviews highlight how water quality affects the longevity of washing machines and dishwashers, a concern that extends to mobile living.
Portable softeners are also lighter and more compact than traditional systems. A typical unit weighs 10 to 20 pounds when empty, stores in a small compartment, and doesn’t require permanent mounting or complex plumbing modifications.
Top Features to Look for When Choosing a Portable Water Softener
Not all portable softeners are created equal. Here’s what separates the capable units from the gimmicks:
Grain capacity determines how much water you can soften between regenerations. A 16,000-grain unit handles about 300 gallons at 10 gpg hardness, while a 64,000-grain model can treat 1,200 gallons under the same conditions. Match capacity to your water usage and how often you’re willing to regenerate.
Resin quality matters. High-grade ion-exchange resin lasts longer and regenerates more efficiently. Look for units that specify food-grade resin or those designed for potable water use.
Hose fittings and flow rate should match your setup. Standard 3/4-inch garden hose threads are most common. Flow rates of 3 to 5 GPM work for most RV and marine applications but may feel slow if multiple fixtures are in use.
Regeneration method varies by model. Some units require you to pour salt brine through manually: others include built-in brine tanks or caps that simplify the process. Manual regeneration is lighter and more portable, but built-in systems are more convenient if you have storage space.
Portability and weight are critical if you’re moving the unit frequently. Opt for units with handles, compact footprints, and durable housings that won’t crack if jostled in a storage bay.
Bypass valve or shutoff is a useful feature if you want to switch between softened and unsoftened water for tasks like filling fresh water tanks or rinsing exteriors.
Installation and Setup: Getting Your On the Go System Running
Installing a portable water softener is simpler than most RV or marine projects, but there are a few key steps to avoid leaks and ensure consistent performance.
Step 1: Pre-Rinse the Resin
Before first use, flush the resin bed with clean water to remove any shipping dust or fines. Connect the softener to a hose, open the outlet, and run water through for 3 to 5 minutes until it runs clear.
Step 2: Position and Connect
Place the unit on a stable, level surface near your water source. Connect the inlet to your city water hookup or pressurized water line using a standard 3/4-inch garden hose. Attach the outlet hose to your RV’s fresh water inlet or fixture. Use Teflon tape on threaded connections to prevent leaks.
If you’re using the softener with a boat or portable shower, a pressure regulator (40 to 50 psi) is recommended to protect the resin tank and fittings from high municipal water pressure.
Step 3: Check for Leaks
Turn on the water slowly and inspect all connections. Tighten any fittings that drip. Once pressure stabilizes, open a downstream faucet to purge air from the line.
Step 4: Test Hardness
Use a water hardness test kit (available at hardware stores or online) to confirm the softener is working. Test strips or liquid reagent kits measure hardness in gpg or ppm. Softened water should read 0 to 1 gpg.
Safety note: Wear gloves when handling salt brine during regeneration. Avoid over-tightening plastic fittings, which can crack under stress.
Maintenance Tips to Keep Your Portable Water Softener Performing Optimally
Portable water softeners are low-maintenance, but neglecting them leads to reduced efficiency, resin fouling, and shorter service life. Here’s how to keep yours running smoothly.
Regenerate on schedule. Don’t wait until you notice hard water symptoms. Track your water usage and regenerate before the resin is fully exhausted. Most units include a capacity calculator or chart. For a 16,000-grain softener treating 10 gpg water, regenerate every 250 to 300 gallons.
Use the right salt. Regenerate with table salt (sodium chloride) or water softener salt, not rock salt or salt substitutes. Dissolve about 2 to 4 cups of salt per regeneration cycle in warm water to create a brine solution, then pour it through the unit according to the manufacturer’s instructions.
Flush after regeneration. After brining, rinse the resin bed with fresh water for 5 to 10 minutes to remove excess salt and prevent salty-tasting water downstream.
Inspect hoses and fittings regularly for cracks, leaks, or wear. Replace O-rings and washers annually or sooner if you notice drips.
Store properly in the off-season. If you’re not using the softener for extended periods, regenerate it, rinse thoroughly, and store it with the caps on in a climate-controlled space. Freezing can crack the resin tank.
Test your water periodically. Source water hardness can vary by location. Re-test when you move to a new campground or marina to adjust your regeneration schedule.
Many project cost guides emphasize the importance of routine maintenance to extend the life of plumbing and water treatment equipment, portable softeners are no exception.
Comparing Portable vs. Permanent Water Softening Systems
Portable and whole-house water softeners both use ion-exchange resin, but they’re designed for different use cases. Here’s how they stack up.
Capacity and flow rate: Permanent systems range from 30,000 to 80,000 grains and deliver 10 to 15 GPM, enough to supply an entire household simultaneously. Portable units top out around 64,000 grains and 5 GPM, suitable for light use or single fixtures.
Installation complexity: Whole-house softeners require permanent plumbing connections, a drain line for brine discharge, and often an electrical outlet for automatic regeneration timers. Portable units connect with hose fittings and regenerate manually with no drain or power needed.
Regeneration: Stationary systems regenerate automatically on a timer or meter-based schedule using a built-in brine tank. Portable units require manual salt brining, which takes more hands-on effort but gives you full control.
Cost: Entry-level permanent softeners start around $400 to $600, plus installation labor if you hire a plumber. Portable softeners run $150 to $300 and require no professional installation. Long-term salt costs are similar per gallon softened.
Use case: If you live in one place and have moderate to high water hardness, a permanent system makes sense. If you’re mobile, renting, or only need softened water occasionally, a portable unit is more practical. Some RV owners even keep both, a portable softener for travel and a stationary system at their home base.
For those weighing installation costs and complexity, checking out contractor matching services can clarify what professional installation of a permanent system might run in your area.
Conclusion
Portable water softeners offer a practical, affordable solution for travelers and mobile living enthusiasts who don’t want to compromise on water quality. They’re lightweight, easy to install, and effective at removing the hardness minerals that damage plumbing and reduce soap efficiency. With proper maintenance and regeneration, a good on-the-go softener can last for years and save you money on repairs and cleaning products. Whether you’re weekending in an RV or living full-time on a boat, softened water makes life more comfortable and protects your investment in onboard systems.